Yes, but I have only ever been asked for this once, so I am not going to add it as an option unless a couple more people want it. Thanks for the question Martin W.
Changing the order is easy, however do keep in mind that if there is an update to the plugin it might be lost.
Be sure to back up your files, just in case
Open /wp-content/plugins/speakout/class.signature.php about line 159
As for the numbering, same thing about losing changes.
Open /wp-content/plugins/speakout/includes/class.signaturelist.php
Around line 43 we set the start number for the page we are displaying. Change
$current_signature_number = $total - $start;
to
$current_signature_number = $start + 1;
The +1 is so it doesn't start at 0.
At around lines 263 & 387 instead of counting backwards we count forwards. Change
$current_signature_number --;
to
$current_signature_number ++;
save the file.
Admire your handiwork.
Can I print the petition and signatures?
Phillip asked a great question:
What I need is a nice little pdf of the text portion of the petition followed by all of the signatories. A nice final little "petition with signatures" that I can submit to someone.
Question: Is there a way to export that that I'm not seeing or ??
I do really like this, but as I explained, for the work involved for me, I am not sure it would be used very often. So it is still in the list of future features, but will wait a while.
However, with a bit of nifty data manipulation, it is possible to create a "final petition with signatures"
Start by going to dashboard > SpeakOut! Pro > settings > admin signature list and choose which fields you would like to include with your document. As an example, let's say just Name and Email. Then choose All Signatures at the bottom, which is the default.
Though if you have confirmations enabled I think best practice (and good ethics) would be to only output confirmed emails
Then go to dashboard > SpeakOut! Pro > signatures. Select the petition. Choose "Download CSV" from the signatures action drop down - then apply.
Open the CSV file in your favourite spreadsheet software e.g. google sheets, and delete and resize columns to suit, I ended up with this
Print that as a PDF. Print your petition as a PDF. Combine the two - I like https://www.sejda.com/pdf-editor
The process is a bit clunky, but given you only have to do it once at the end of a campaign it isn't a big deal and shouldn't take more than 15 minutes or so.
CleverReach
I made a mistake with a link in one version. Click here to go to the correct page.
My page doesn’t refresh and update the signer number
This is the email I received from Wolfgang:
I manage a site where we have installed your plugin on the site and we have the pro-version. Since the last petition the plug-in is not working properly anymore. All the signers are not refreshing. It's only refreshed when I log in to the wp backend. What problem we have here?
In the past I have found this is caused by caching of your site.
This isn't the place to explain caching, but if it is the problem the solution is to go into the caching plugin settings and exclude the page that has the petition on it so it is no longer cached.
How do I remove %%your signature%% from the petition?
Yes, this is an annoyance for some people and I am going to make it an option in the future.
To remove it you need to edit a PHP file.
First make a backup of your site or at a minimum, just the file /wp-content/plugins/speakout/includes/emailpetition.php
Now open that file in an editor. If you use cPanel open it in the file editor.
Remove almost all the line, leaving just the last 2 characters
';
save the file. That should do it.
Include user fields in thank you email
If you would like to send an email to the person after they sign, you enable that in dashboard > SpeakOut Pro > Petitions > edit the petition > petitions options tab - this is only available in the Pro version.
When you are creating the email content, it is possible to include some user input fields in the email. You will find a list of available fields under the field when editing the content.
The current fields that can be included are
%honorific%
%first_name%
%last_name%
%petition_title%
They are all sanitized using the PHP strip_tags() function to prevent users being sent code, malicious or otherwise.
IMPORTANT: If you are including these fields in the email, make the honorific, first name and last name required fields otherwise if they aren’t filled out by the user, they will be empty and it may look odd. Imagine the example below if any of them are empty.
Example: Dear %honorific% Steve Smith, Thanks for signing our petition "We Love SpeakOut!".
Can I remove %%Your Signature%% from the displayed message
In the petition message, at the bottom it includes "%%Your Signature%%" to indicate that it is a placeholder for the person's signature at the bottom of the message sent to the target.
If you want to hide that in the message on your site, you can do so using CSS. Go to dashboard > appearance > customise > additional CSS and add the following at the bottom:
.dk-speakout-caps{ display:none; }
Version 5.?? slows down my plugins page
This is a known issue for which I apologise. It is being caused when checking whether there is a new version and there is a problem connecting to the server license.speakoutpetitions.com
The annoying part for me is that it only seems to affect a handful of people with WordPress hosted on some servers. Until I can solve it there is an easy fix, disable the update checker.
Go to dashboard - SpeakOut! Pro - settings and click on the security tab
There you will see an option to Enable updater. Uncheck it.
Please let me know if you did this via the contact form so I can notify you of updates.
Can any users other than administrators manage SpeakOut!
No, not as the plugin is. But being able to specify roles that have access to SpeakOut! is actually a really good idea (thanks Simone A.), and I will look at making it an option in the security settings.
If you have some PHP coding experience there is a way around this, but the changes will be lost on any upgrade. I am always deliberately vague with this stuff, if you don't have the skills from what I tell you, you shouldn't be doing it ;o)
open /wp-content/plugins/speakout/emailpetitions.php
Line 46 or thereabouts
if ( is_admin() ) {
is where it limits access
If you change that to
if ( is_admin() || current_user_can( 'editor' ) ) {
You would also allow editors to have access
If you want multiple other roles it would look like
WordPress have some (odd) policies around plugins, including (but not limited to) that a plugin is not allowed to include any code that requires payment to activate it. That effectively means that a plugin can't be upgraded to a Pro version by simply activating some code, it has to be a completely different version to the free version. Hence the two different versions of SpeakOut! This makes it much more difficult for an author to maintain.
Additionally, a plugin author is not allowed to offer support for the Pro version through the WordPress support forum.
So if you have the Pro version (thanks!) and have a support question, you need to contact me here.
Do you include a donation form?
No.
I thought about it, but to be effective a donation form should be available site wide, not just in a petition.
Site wide, you can add it to your petition page. If it is built into the petition plugin, you can't add it anywhere else on the site.
Can the petition message contain HTML?
Yes.
Since version 105.2.0 there is an HTML editor included as the default for editing the petition message. It works just like an WordPress text editor...because that's what it is.
I have left the Markdown editor in place as a legacy for people who already have messages created with Markdown.
Note: if you switch from HTML to Markdown (not a good idea) or vice versa you may have to reformat your message, so choose wisely.
Can I moderate signatures?
Suppose you want to minimise fake names and fake email addresses.
First enable email confirmations, that at least makes sure that a legitimate email address is used, though do keep in mind that email addresses are disposable.
If you are also concerned about real email addresses and fake names, you could use the speakout_signature_confirmed webhook to extend - see how to send an email in the example with the speakout_after_petition_sent webhook.
Then you can manually delete any you want to on the signature list page.
Include user fields in petition message
It is possible to include some user input fields in the petition message. You will find a list of available fields under the petition message when editing the petition.
The current fields that can be included are
%honorific%
%first_name%
%last_name%
%address%
%city%
%state%
%postcode%
%country%
%custom1%
%petition_title%
%confirmation_link%
They are all sanitized using the PHP strip_tags() function to prevent users inputting code, malicious or otherwise.
IMPORTANT: If you are including these fields in the petition message, it is advisable to make them required fields otherwise if they aren't filled out by the user, they will be empty and it may look odd. Imagine the example below if any of them are empty.
Example: Dear Mayor, my name is %first_name% and I live at %address%, %city%, %postcode%. The current situation in %country% needs attention. Particularly %custom1%. Thank You, signed %first_name% %last_name%.
Can I force BCC to signer?
This can't be done by the Speakout! petition WordPress plugin itself, but it is easy to do with some CSS magic.
Firstly go to dashboard > SpeakOut! > settings and in the Petition Form tab enable BCC
Now go to your dashboard > appearance > customise > additional CSS and add the following at the bottom of any existing styles:
this will hide the BCC checkbox from view by moving it waaaaay off the page, but leave it checked.
Clarify signature privacy V anonymity?
There are 2 settings in SpeakOut! that affect the public display of signatures if using the [ signaturelist ] shortcode
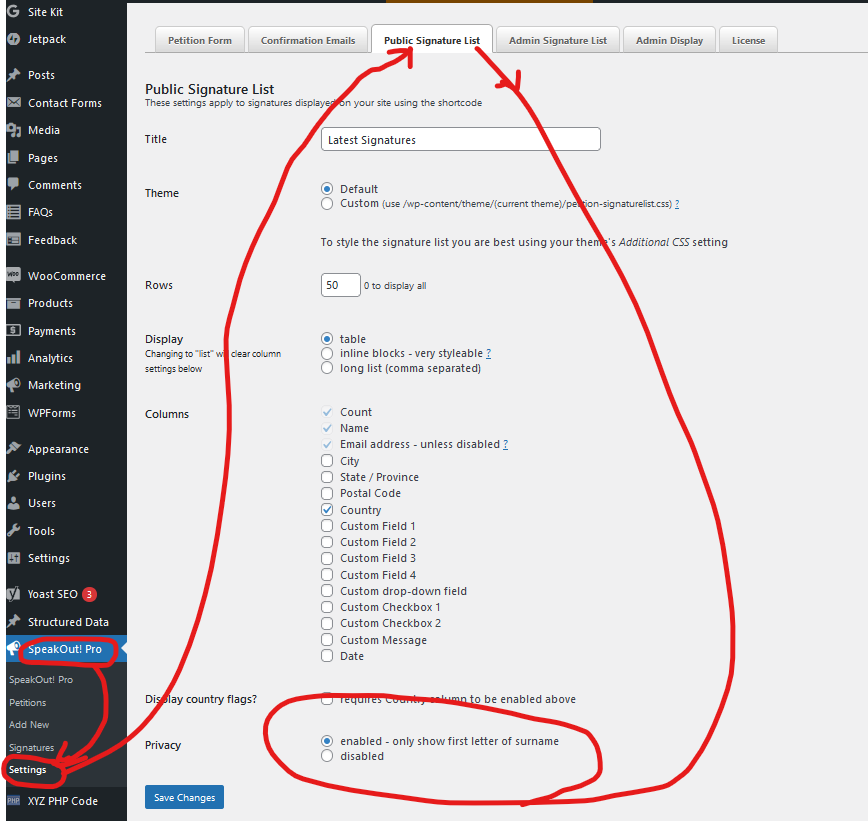
The Privacy setting is enabled in the dashboard > SpeakOut! > settings > Public Signature List page. This is a decision made by the site administrator and will display a signature Chris Brown as Chris B.
Anonymity is enabled by the administrator
but is the choice of the signer
In this case, the the signer's name is hidden from the public completely, but it is sent with the petition.
Be sure to read this before enabling anonymity as it can't be reversed.
My CSV download doesn’t work
If you have a large number of signatures you may find that exporting to a CSV file doesn't work.
This is usually a memory limit issue. Depending on your server you can increase memory in a few different ways
on a cPanel server go to MultiPHP ini editor
add a directive in .htaccess
edit your php.ini file
ask your hosting service
I suggest doubling whatever is there to start with. If it doesn't work, double it again.
Depending on your server and the resources available you may want to revert to what was there originally.
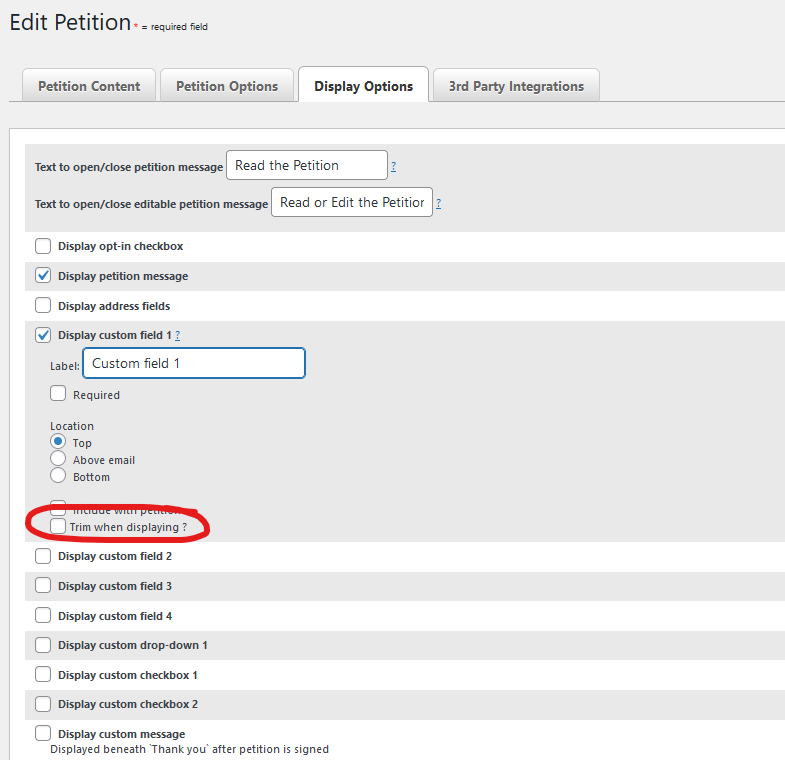
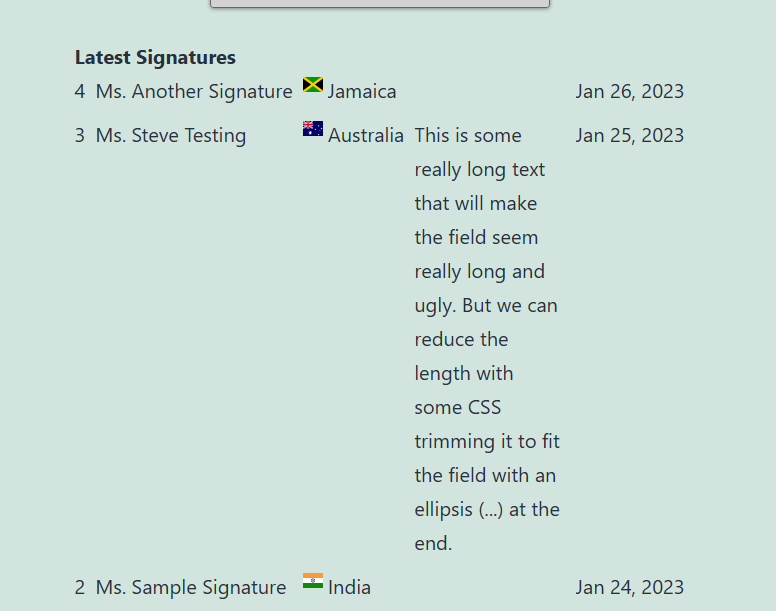
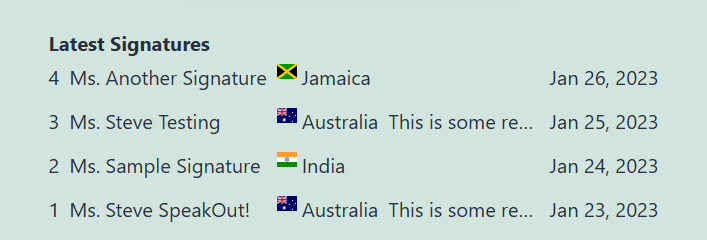
Truncating custom fields
When enabling a text custom field (the free version only has 1) there is an option to "Trim when displaying".
This is useful if you are allowing people to enter some text in a field e.g. "Why did you sign?", but when displaying the signature list, it is just too long.
If you enable this option, instead it will display like this.
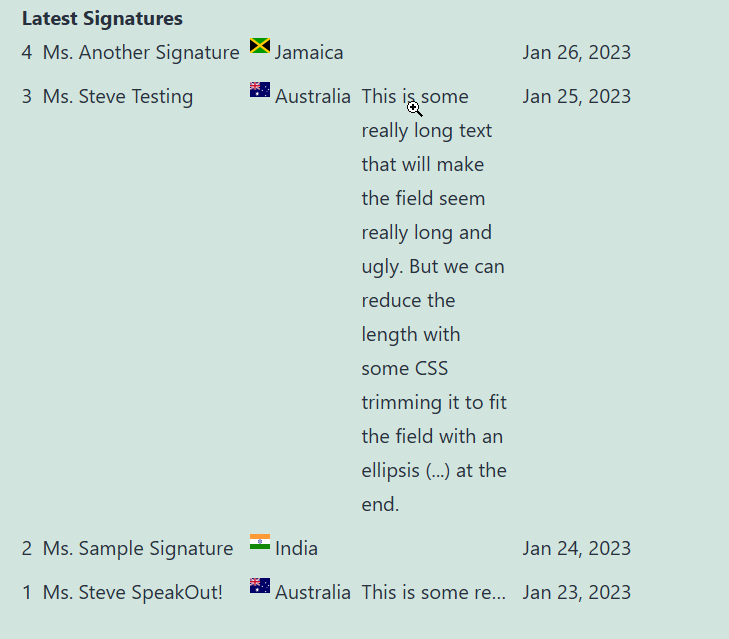
But wait...the full text shows when mousing over
How cool is that? This won't work on a mobile device, so instead the whole field is displayed.
WordPress doesn't allow the free version of a plugin to include disabled features that must be paid for. The solution is an enhanced but different Pro version of SpeakOut!. This page will help you upgrade the Speakout! WordPress petition plugin.
First and most important thing; do a backup of your wordpress site. But also think about this: it is one thing to do a backup, but have you ever tested that you can restore from a backup?
If you are upgrading from the free version, ensure you have updated to the latest version before proceeding. If you don't your database may not be up to date and the Pro version will install but not work properly.
Also, DO NOT UNINSTALL THE FREE VERSION unless you don't have any petitions or signatures or they will all be lost.
You don't have the free version and are installing the pro version for the first time
You have the free version and are upgrading to the Pro version
You already have an early Pro version (104) and need to upgrade to 105
You are having trouble upgrading
first time installor upgrading an existing Pro version (this is probably the easiest and best method) - in your WordPress dashboard go to plugins > add new plugin > upload plugin and upload speakout.zip as is.
Unless you are a new user, you will likely get a warning that it already exists - it is fine to replace current with upload. You have a backup, right?
cPanel file manager - go into cpanel > file manager (or any other file manager you use) navigate to public_html/wp-content/plugins. Rename speakout to .speakout which makes it invisible and acts as a backup. Extract speakout.zip, it will create a new speakout folder and upgrade the database.
cPanel file manageralternative - go into cpanel > file manager navigate to public_html/wp-content/plugins. Rename speakout to .speakout which makes it invisible and acts as a backup. In the dashboard go to plugins > add new > upload (speakout.zip) > install and the built in plugin installer will do its job.
FTP - upload speakout.zip to public_html/wp-content/plugins. Extract the file, it will over-write existing files and upgrade the database. You might want to rename speakout to .speakout which makes it invisible and acts as a backup, however if you are using FTP, I assume you have more advanced skills.
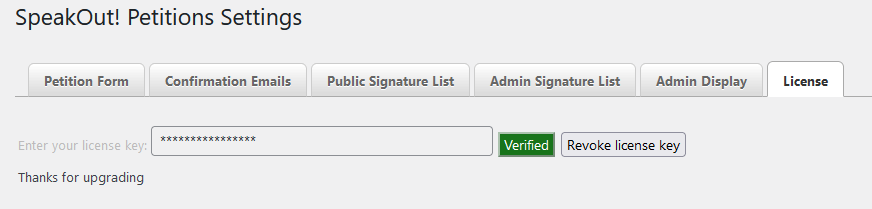
The Pro version won't work without a license key. If you have already upgraded, it should be activated automatically, otherwise click the SpeakOut! menu item in the dashboard and enter your license key.
How do I upgrade my site to Pro
When you received your license key it included a link to download the Pro version of SpeakOut! Once you have reached version 104.1.0 you shouldn't need to do it manually.
SpeakOut! licenses are for use on a single site. In the Pro version (i.e. a license has been verified) there is a button to "revoke license key" which will revert the SpeakOut! plugin to the free version and make the key available to be used elsewhere.
Perhaps you have installed it on a development site and are ready to move to a production site, if so (or for any other reason), you can revoke the license key and then verify on your new site with the same key.
Can I use my license key on multiple sites?
The short answer is no.
The longer answer is that if you have essentially the same site, but in different countries or languages I will likely give you a free license key if you ask.
If I am opposed to your cause, the answer is still no. Isn't free speech wonderful?
But if you don't want to do that on a production site, here is a way to try it out on a dummy site https://tastewp.com/new/?pre-installed-plugin-slug=speakout This is a cool trick TasteWP does to create a test site instantly and install any plugin. You can play with this site for 2 days for free.
Can I change the submit button?
Both the text and colour of the "Sign Now" submit button can be changed to suit your site.
Change the text in dashboard > SpeakOut! > settings > Petition Form tab > Submit button text
If you want to make substantial changes to the styling of the petition form, you are probably best to use a custom CSS style sheet - read this
If you would just like to change the colour, use your theme's custom CSS feature and add the following, modifying the colours to suit:
If your theme doesn't show Additional CSS you can access it directly from yoursite.com/wp-admin/customize.php
Why a Pro version?
There will always be a 100% free and useful version of SpeakOut!
Unfortunately donations were very rare and therefore I didn't spend as much time on the plugin as it deserves and I would have liked to.
Since July 2022 there is a Pro version of the plugin, this will obligate me to continue to work on SpeakOut!. If you have donated in the past, no matter how big or small, please request a free license key - contact me with the date and amount
The Pro version includes all features, this is not the complete list of limitations:
Free
Pro
Petitions
1
unlimited
3rd party integration
Custom fields
1 text
9 including a drop down and checkboxes
Allow message to be edited
Redirect after successful sign
Set expiration date
Display custom message
Signature list styling
Country flags in list
Google recaptcha
hcaptcha
Licenses will only work on a single site. I understand that some organisations have campaigns in multiple countries and may have more than one site. Contact me, if I am sympathetic to your cause I will probably give you free extra licenses like I did for Amnesty.org
Stop signature list name capitalization
In /wp-content/plugins/speakout/css/signaturelist.css at about line 38 you will find
Insert the SpeakOut! shortcode in the post content with the standard WordPress editor.
The content that I would usually publish in the post content, I have put it in a WYSIWYG type custom field.
In the design of the individual view I have put that custom field with the information in the left column and in the right column I have put the dynamic field with the content of the post. This way, the shortcode is loaded by the WordPress generic system and not by Elementor.
I confess to not fully understanding this as I don't use Elementor, but if it works, that is a good thing.
How do I add a petition to Avada builder?
In Avada builder, and likely other builders like Divi, WP Bakery etc, create a text element and add the shortcode to that.
If you add the shortcode to a regular paragraph element it won't work.
Duplicate a petition
Yes
dashboard > SpeakOut! > Petitions > (mouseover the petition) Duplicate
The new petition is created and you are taken to a page to edit it.
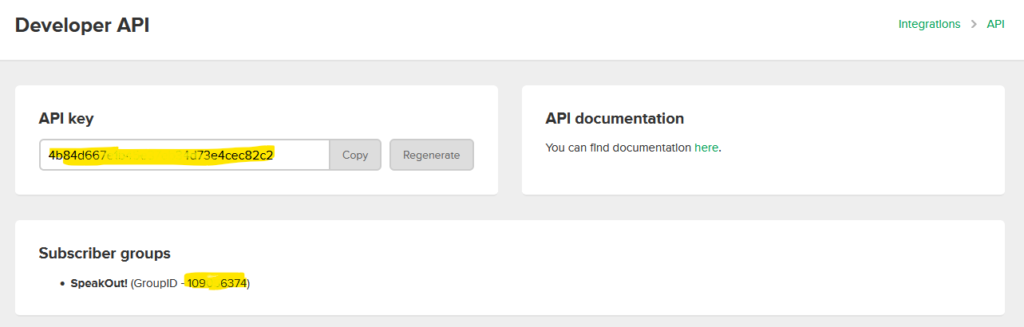
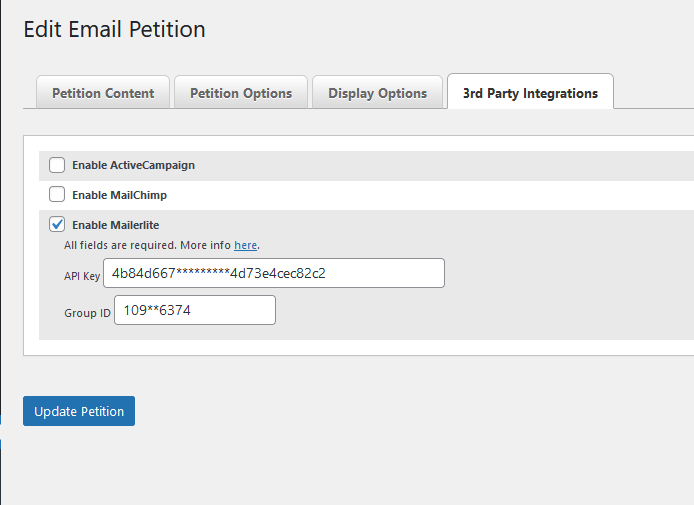
You need 2 pieces of information to connect your petition to Mailerlite; the API Key and the Group ID. You add the information in the dashboard > SpeakOut! > Petition > edit > 3rd Party Extras tab. This is a Pro feature.
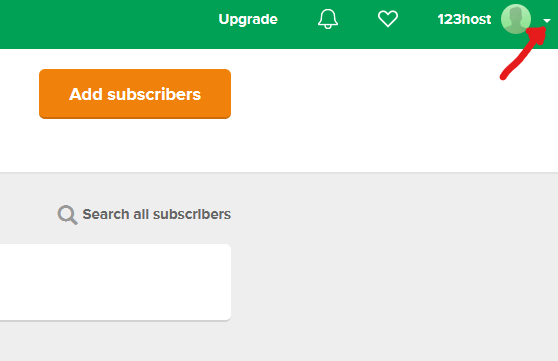
Log into Mailerlite and in the top right corner click the drop down arrow next to your account name
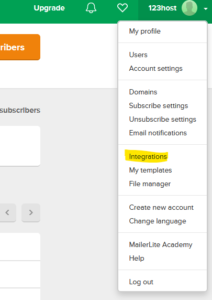
Click Integrations
Beside the Developer API item at the top, click Use
The values you need will then be revealed - assuming you have your group already set up
Copy them both into the SpeakOut! fields, update your petition and test.
NOTE: for this to work, you must enable the 'Display opt-in checkbox' under the Display Options tab on the edit petition page. i.e. you can't add people to your mailing list without their permission.
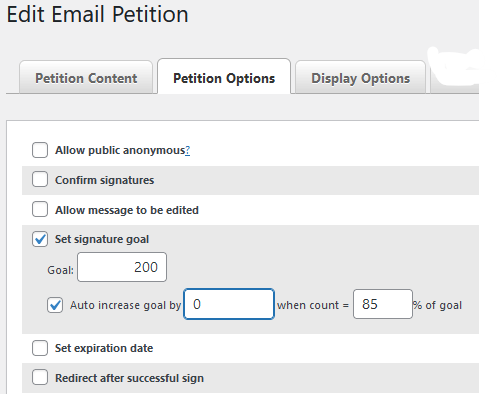
Auto update the goal
In the SpeakOut! WordPress Petition plugin it is possible to set a goal for how many signatures you wish to collect. This can be displayed as a bar graph.
It is possible to have the goal automatically increase when you reach a specified percentage of your goal.
In dashboard > SpeakOut! > petitions > edit > petition options there is an option to set the signature goal
Check the box and it reveals another option to auto increase goal
selecting that reveals some options
This is pretty self-explanatory. However you may not want to have to update manually.
If you would like SpeakOut! petition plugin to manage the goal increase automatically set the auto increase by value to 0
When your trigger % is reached e.g. 85%, SpeakOut! will do some calculations and add around 50% to your goal, also rounding it so the goal is "pretty" e.g. 1,500, instead of a literal calculation that could end up being 1,432
If you use ActiveCampaign.com for your campaign, SpeakOut! can automatically add signers to your list of contacts if they check the "Add to mailing list" option, assuming you have it enabled and have ActiveCampaign enabled in the petition settings.
To enable ActiveCampaign go to dashboard > SpeakOut! > petitions > edit the petition > 3rd Party Extras tab. Checking the box will expose the fields that you need to find and enter. This is a Pro feature.
Campaign ID - Open your campaign, look at the URL and find the ID number https://youraccount.activehosted.com/admin/main.php?action=campaign_new_list&id=1
You will find the server URL on the same page.
Your new contact will be added to your account.
There are 2 likely scenarios that you may have. A single campaign with a number of petitions or a number of separate campaigns, each with its own petition.
In scenario 1, a single campaign, use the same ActiveCampaign API details for each petition.
If you have separate campaigns, assuming they are all in the same ActiveCampaign account, the only thing to change is the list ID for each petition. The API Key and server ID will be the same.
NOTE: for this to work, you must enable the 'Display opt-in checkbox' under the Display Options tab on the edit petition page. i.e. you can't add people to your mailing list without their permission.
If you use Mailchimp SpeakOut! can automatically add signers to your audience (your list) if they check the "Add to mailing list" option, assuming you have it enabled and have Mailchimp enabled in the petition settings.
The only fields sent to mailchimp are first name, last name, email address and country. If enough people request an additional field, I will consider adding it.
To enable Mailchimp go to dashboard > SpeakOut! > petitions > edit the petition > 3rd Party Extras tab. Checking the box will expose 3 fields that you need to find and enter.
If you have the 2FA setting enabled, your new audience member (their terminology) will receive an email to confirm their address.
There are 2 likely scenarios that you may have. A single campaign with a number of petitions or a number of separate campaigns, each with its own petition.
In scenario 1, a single campaign, use the same Mailchimp API details for each petition.
If you have separate campaigns, assuming they are all in the same Mailchimp account, the only thing to change is the list ID for each petition. The API Key and server ID will be the same.
NOTE: for this to work, you must enable the 'Display opt-in checkbox' under the Display Options tab on the edit petition page. i.e. you can't add people to your mailing list without their permission.
There are so many reasons this could be happening, we need to discover what is going on. To do that we get WordPress to email the site administrator (you?) with the details of the error.
Open for editing /wp-content/plugins/speakout/includes/class.mail.php - go to line 366 or thereabouts where you should find:
//mail(get_option('admin_email'),"Mailchimp error", "There has been an error adding an email address (" . $email . ") to Mailchimp in the SpeakOut! plugin - response status " . $response->status);
replace that line with two lines
$responseOutput = print_r($response, true); mail(get_option('admin_email'),"Mailchimp error", "There has been an error adding an email address (" . $email . ") to Mailchimp in the SpeakOut! plugin - the error is: " . $responseOutput . ". You may need to send this to Steve via https://SpeakOutPetitions.com/contact");
If you do receive an error message do a search for what it means, e.g. mailchimp error "Your merge fields were invalid" and if you can't make sense of it, send it to me. FWIW the above error is sometimes caused by mailchimp set up to require something like postal code, which isn't sent by SpeakOut!.
This is the way to do debugging in 105.2.2. In future versions this will be an option that can be enabled in the plugin when you enable MailChimp.
NOTE: Since 105.2.0 there is an HTML editor available as an option.
Can I add a custom field?
You can add up to 9 custom fields.
Four are text fields, one is a drop-down and four are checkboxes - see more info below.
Apart from the checkboxes, the field contents are included at the bottom of the petition email sent to your target by default, however when setting them up you can choose to not have them included.
Go to dashboard > SpeakOut! > petitions > edit > display petition options tab and click one of the Display custom field n checkboxes to reveal some option fields including the field label, placeholder text whether it is sent with the petition and whether or not to make it required.
Custom fields 1 - 4 are standard text fields.
Custom field 5 is a drop-down field. Options can be added in the dashboard values field by separating each value with a| character e.g. one|two|three|something|else
Custom checkboxes 1 - 4 are not included in the petition. They are intended for you to collect info e.g. I would like to volunteer or I am a regular visitor to this place etc. For any info you want to include with the petition to the target, use one of the other custom fields.
There is a file /wp-content/plugins/speakout/includes/countries.txt which contains a list of countries. This is the default country list.
If you want to have your own list, firstly make a copy of that file and place it in /wp-content/plugins/speakout/custom. If this file exists, it is used instead of the default file.
Each country must be on its own line and has a separator | (a pipe symbol) between the English name (for the database) and the display name which can be in the language of that country.
Country names can also be listed in whatever order you choose and you can even remove all the not needed countries e.g. if your petition is limited to Mexico, you might remove all other countries to make the page smaller to load and also less complex for users.
Any files in the custom directory will remain untouched during updates, so your custom strings will be safe.
An honorific is the title used to address someone. In English it could be Ms., Mr., Dr., etc.
The default list will never be perfect and it can be modified to suit you.
Open the file /wp-content/plugins/speakout/includes/honorifics.txt and you will see a list of honorifics.
To make your own list you need to copy that file to /wp-content/plugins/speakout/custom/honorifics.txt. If that file exists it is used instead of the default file.
IMPORTANT: Each honorific is on its own line. They can be in your language in whichever order you choose.
Any files in the custom directory will remain untouched during updates, so your custom strings will be safe.
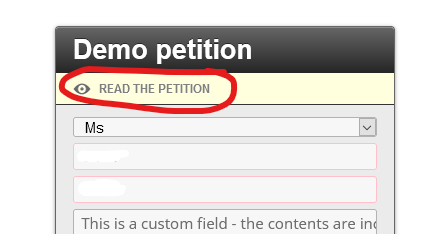
There is a second field to enter text. This is useful if you allow the petition to be editable, you can enter "Read or Edit the Petition".
Can I add a link to the petition message?
No, and this is intentional for security (and safety) reasons.
The petition message is sent to someone like the mayor or another politician, it is not a good idea for my plugin to allow people to put links in those emails. It could be used to deliver malware or other bad things.
Can people sign anonymously
Of course, people can give fake names and email addresses (unless confirmation is enabled) which effectively makes them anonymous.
However this might compromise the integrity of the petition giving the target an excuse to ignore it.
It is possible to have a signer's real details sent with the petition, but hidden completely on the public signature list.
Edit your petition and in the Petition Options tab notice the option to "Allow public anonymous". Enabling that will display "anonymous" in the list of signatures, but only if the signer chooses the "hide name from public" option.
In all other aspects, the name is treated as entered.
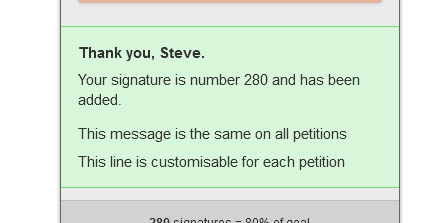
How do I customise the success message?
After your petition has been signed, a message is displayed
This can be customised, including adding some personalised information. Set this in dashboard > SpeakOut! > settings > Petition Form tab > success message
There are 3 variables that can be included, first name, last name and the signature number. A limited number of HTML styling tags can be included. This setting is applied to each petition.
In the example above the field looks like this:
<strong>Thank you, %first_name%.</strong>
<p>Your signature is number %signature_number% and has been added.</p>
The text "A custom message after signing" is customisable per petition in dashboard > SpeakOut! > petitions > edit (choose petition) > Display custom message
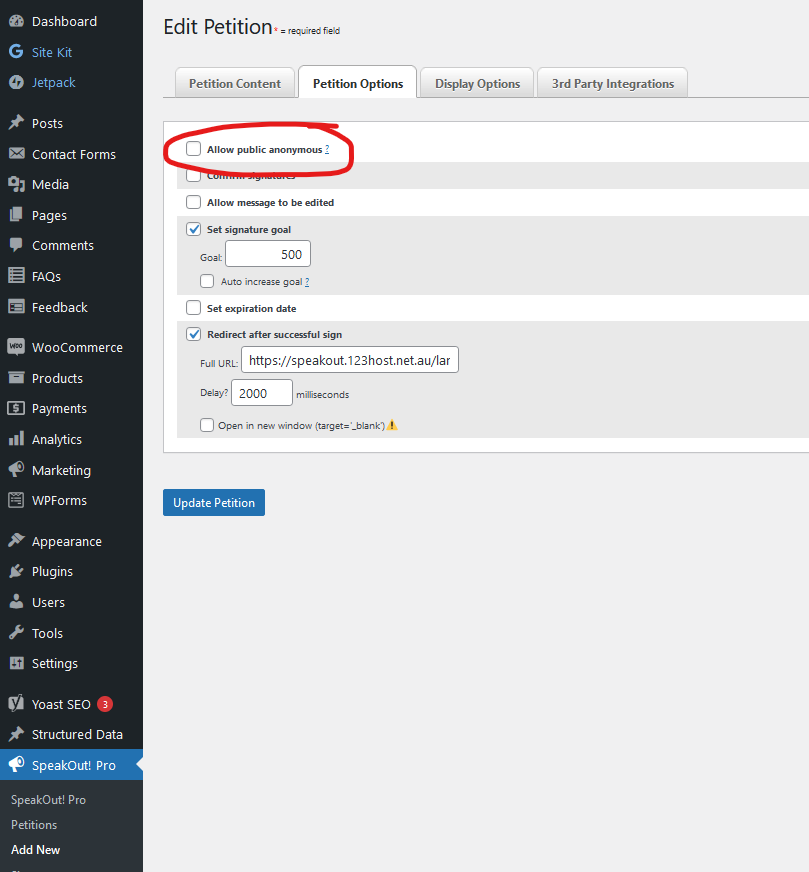
What is ‘no email address’ and why can’t it be reversed?
If you have chosen to not send the petition...
this enables a further (dangerous) option on the "Petition Options" tab.
Notice that the "confirm signatures" option is now disabled as is the "Display Opt-In checkbox" option on the Display Options tab.
The "Don't collect email address" option does exactly what it implies, there will be no email address field displayed in the petition.
This was a feature request and has some serious implications;
Since the database requires a unique email address for each signature, once you start collecting data with no email address, you can't reverse that. Otherwise the database would be full of empty email addresses which are (obviously) not unique
To give them some legitimacy, petitions sent to a target (e.g. your mayor) come from the signer@their-email-address. If we don't have their email address then sending to a target is not allowed.
No email address also means there can be no optin to a mailing list
One of the principles of the SpeakOut! plugin is to ensure that petitions have high integrity so that the target can't dismiss a petition as being flawed simply because it came via the SpeakOut! plugin.
Can I format the petition message?
SpeakOut! supports HTML in message editors and emails that are sent.
There is also a deprecated option for Markdown, but I strongly advise using HTML.
Note: if you switch from one to the other you may have to reformat your message, so choose wisely.
Can I style the signature list?
In version 2.3.1 an additional inline-block structure was added. This allows for more flexibility but some knowledge of CSS is needed. You can choose this in
dashboard > SpeakOut! > settings > signatures tab
Here are a few sample CSS code blocks that you can insert into your theme's Custom CSS settings.
Remove the border, have signatures flow and add a | (pipe symbol) between them:
Change the number of columns - this will always need a little bit of experimentation on your part. For example, creating 3 columns using 33.3% may not work, try 32% or 31%...keep tweaking. Same for 2 columns, instead of 50% try 49.5% or 49%.
.dk-speakout-signaturelist { width:32%; }
Of course, you can still choose to display signatures in a standard table or the run-on list of signatures if you prefer.
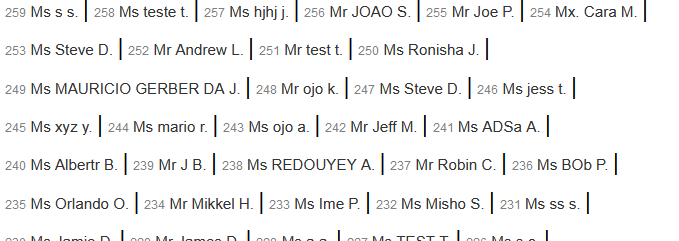
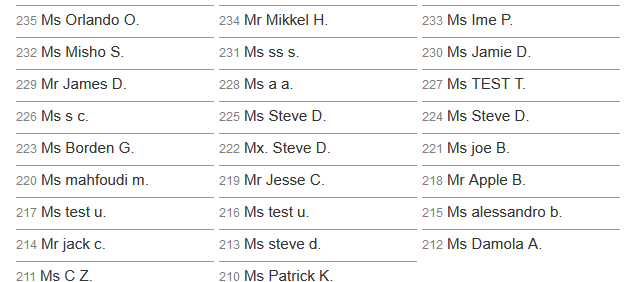
Can I display signatures in alphabetical order?
If you want to make the list of signatures displayed on your site sort by last name;
In the file /wp-content/plugins/speakout/includes/class.signature.php find at about line 76
ORDER BY $db_signatures.id DESC $sql_limit
and change it to
ORDER BY $db_signatures.last_name ASC $sql_limit
to order by last name ascending. If you want descending
ORDER BY $db_signatures.last_name DESC $sql_limit
This file is updated pretty rarely, if ever, so your changes should be pretty sticky.
Why doesn’t the redirection to an external site work?
If you have your petition redirect to a different URL after signing and you also have checked the option target="_blank" hoping it will open in a new window, it is unlikely to work as you expected.
The issue is that spammers and scammers have abused the browser popup function and it is now blocked by default.
You can still do it, but your visitor may have to explicitly allow the popup.
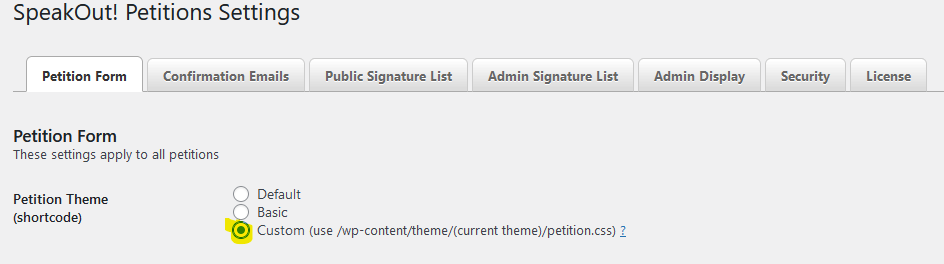
First, select “Custom” as your theme on the Settings screen.
Then copy one of /wp-content/plugins/speakout/css/theme-standard.css or /wp-content/plugins/speakout/css/theme-basic.css to /wp-content/themes/your_theme/petition.css. This will be a template for your new styles - you can start from scratch if you like, but it isn't a wise idea. Now you can edit petition.css and unless you change themes, your custom styles will not be modified by the plugin.
Custom styles can also be created for the widget and signaturelists by copying petition-widget.css and/or petition-signaturelist.css to your theme directory just as you did with the petition CSS and you also change the CSS setting these items to “None”.
Of course, you can always use the WordPress custom CSS option, however if you change themes they are lost.
CSS is an art in itself and using it WordPress takes some skills. Have a look at this list of videos, I am sure you will find enough to get you started
How do I enable a captcha
Open the dashboard > Speakout! > settings and you will see an option to enable either hcaptcha or google recaptcha.
It is necessary to obtain your own site key and secret key from the appropriate website.
How do I enable the anedot form?
To enable the anedot settings tab you will find an option in the settings page under the petitions tab. Checking the box and saving will then display a new tab with fields for anedot settings. If you add a page id, it will attempt to display a donation link in the success message after someone has signed. I have no idea about anedot.com itself, this was a request.
Can I hide the petition message?
Yes. In the petition edit page, on the right is an option to hide the message that is sent with the petition. The purpose of this is so that you can add the text of your petition to the page itself, likely above the petition. You could then format it a bit better than the default display.
Does SpeakOut! comply with GDPR?
The plugin doesn't need to comply, it is your site that has to meet the rules. I have done my best based on what people have asked for. Under dashboard > SpeakOut! > settings there is a new item at the bottom to Display Privacy Policy accept". If you check that box and fill in the URL to your privacy policy a checkbox will be displayed on your petition form with a link to your privacy policy.
If it needs more work (I am not in the EU) please send me a message via the contact form.
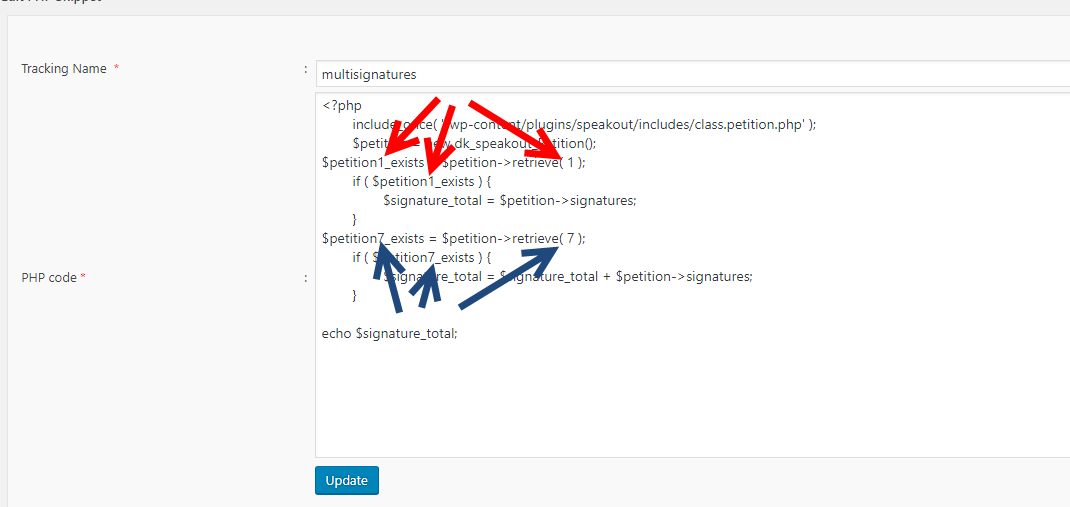
Can I display the total signatures of 2 petitions?
Yes, but it isn't quite so straightforward.
Note that in the Pro Version there is a shortcode ( [signaturestotal hideunconfirmed="true"] ) to display the total signatures of all petitions.
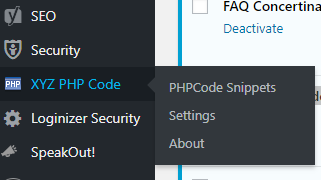
Firstly install the plugin: Insert PHP Code Snippet. This allows us to add PHP code to the page.
Go into the XYZ PHP Code > Settings and disable Autoinsert PHP opening tags
Then go back to XYZ PHP Code > PHP Code Snippets and Add new PHP code snippet
Before you add the code, notice the arrows, the number in each case has to match the petition number.
Tracking name: multisignatures
PHP Code:
// IF YOU ARE USING THIS ON A PAGE WITHOUT A PETITION you need to include the petition class by removing the // from in front of the next line
//include_once( 'wp-content/plugins/speakout/includes/class.petition.php' );
// create a new petition object
$petition = new dk_speakout_Petition();
// check if first petition exists
$petition1_exists = $petition->retrieve( 1 );
// if it does
if ( $petition1_exists ) {
// get the signature count and save it in $signature_total
$signature_total = $petition->signatures;
}
// see if our next petition exists
$petition7_exists = $petition->retrieve( 7 );
if ( $petition7_exists ) {
// this time add our signature count to $signature_total - we have a running total
$signature_total = $signature_total + $petition->signatures;
}
// you could repeat the second block to add a 3rd or more petitions
// print the signature total on the page
echo $signature_total;
Awesome! We now have the total signatures of petitions 1 & 7 sitting in a variable ready to be displayed on the page.
Next we need to add the shortcode to the page to actually display it.
Total signatures - [xyz-ips snippet="multisignatures"]
Here is live data - The total of two SpeakOut! demo petition signatures is 497 - note that this is actually petitions 1 & 8, I didn't want to have to do the screenshots again 😛
Can I make the postal code a required field?
You need to edit two files in order to get the new “required” fields working. First file is /wp-content/plugins/speakout/includes/emailpetition.php and the second file is /wp-content/plugins/speakout/js/public.js
The first file: emailpetition.php
The following steps are required in order to make the field “required”.
if ( lastname === '' ) { $( '#dk-speakout-last-name-' + id ).addClass( 'dk-speakout-error' ); errors ++; }
Append the following code just after this section .
if ( postcode === '' ) { $( '#dk-speakout-postcode-' + id ).addClass( 'dk-speakout-error' ); errors ++; }
So it should look like this:
if ( lastname === ” ) { $( '#dk-speakout-last-name-' + id ).addClass( 'dk-speakout-error' ); errors ++; } if ( postcode === ” ) { $( '#dk-speakout-postcode-' + id ).addClass( 'dk-speakout-error' ); errors ++; }
(Thanks to @altinkaya)
Will you fix my site?
Possibly, if you make a reasonable donation and contact me.
Can I import existing petitions and signatures from SpeakUp?
SpeakOut! was forked from an abandoned plugin speakup.
Since version 1.3.0 there is an item in the dashboard menu to import from speakup to SpeakOut! This is a non destructive import, it doesn't affect the existing SpeakUp data at all, simply copies it to SpeakOut! If you have any previous petitions in SpeakOut! they will not be affected. Legacy SpeakUp shortcodes will still work, but the petition ID may need to be updated.
After importing it is strongly recommended that speakup be deactivated.
I downloaded the CSV file, but when I open it in a spreadsheet application, the values aren’t in the correct columns. Can I fix this?
If the CSV file looks scrambled, try changing its filename extension from .csv to .txt and then re-opening it in your spreadsheet app. The columns should be arranged correctly.
If you wish to keep the .csv extension, once you've opened the .txt file, re-save it as a CSV from your spreadsheet app, which will structure the contents of the file in a version of the CSV format that it understands.
Can I download a list of my petition’s signatures?
To download the signatures in CSV format, click the "Download as CSV" button at the top of the Signatures screen. If you do not see a "Download as CSV" button on this screen, you will first need to select your petition from the drop-down list.
Is there a way to publicly display the names of people who have signed my petition?
Place the signaturelist shortcode wherever you want the list to appear in your post (be sure to set the 'id' value to match the id number of your petition). Example:
[signaturelist id="1"]
Is it possible to have the petition form hide after it has been signed leaving the success message and social media icons?
There are instructions in the file /wp-content/plugins/speakout/js/public.js at about line 110.
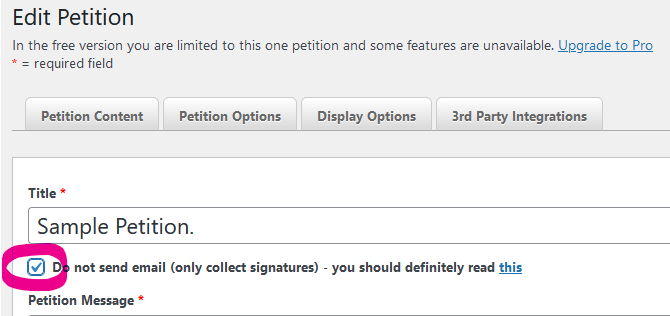
Can I run a petition without having it send email?
When you create a new petition, simply select the checkbox labelled "Do not send email (only collect signatures)" at the top of the Petition box and email will not be sent out when the petition is signed.
Is there a way to confirm a user’s email address when they sign a petition?
Simply select "Confirm signatures" when creating a petition and a confirmation email will be sent to the address used to sign the petition.
By clicking the link in the confirmation email, the signer can confirm their email address. The petition message will not be sent to the target until the signer's email address is confirmed.
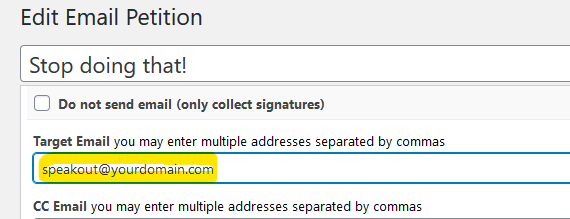
Can the petition message be sent to multiple email addresses?
Yes. In the Target Email field, simply enter a comma-separated list of email addresses.
The First Name, Last Name or Email fields in the petition form display the name and email of the site administrator. What’s going on?
These fields are filled automatically for logged-in users. You are seeing the name and email info associated with your user account. Other users will see their own information in these fields. Or, if the user is not logged-in, the fields will be empty.
How can I create a custom style for the petition form?
First, select "None" as your theme on the Settings screen. Then add a 'petition.css' file to your theme folder. You can use the styles included in the plugin's CSS folder as a starting point for your custom theme — just copy the contents of 'theme-standard.css' or 'theme-basic.css' into your 'petition.css' file and make any modifications you desire.
Custom styles can also be created for the widget and signaturelists by adding petition-widget.css or petition-signaturelist.css to your theme and changing the theme for these items to "None".
Why aren’t emails being sent?
Depending on your server's configuration, emails may not be sent to the petition target or to the signer if confirmation is enabled.
Further, some email services (like AOL, Hotmail, and a few others) do not accept mail sent from the PHP mail() function. So, people who sign your petition with an email address from one of these providers may not be able to receive a confirmation email.
To get around this problem, try installing the WP Mail SMTP plugin which will redirect calls to the PHP mail() function through your webserver's SMTP configuration and should solve the problem.
Why are some phrases not translated into my language?
It is only the fixed phrases that will will automatically translate. Some of the strings on a petition can be edited, change them in dashboard > SpeakOut! > settings > check all the tabs.
If it is a fixed word or phrase, I might have missed it. Let me know via the contact page.
My language isn’t available, will you translate Speakout! for me?
Then make that forwarder ([email protected]) your target email in the petition.
So when the petition is sent to [email protected] it is forwarded to everyone in your list.
That is tedious, can I change the code?
Firstly, backup your database:
Then in your database, in the table wp_dk_speakout_petitions change the target_email from type VARCHAR (300) to LONGTEXT - this allows more data to be stored in the database table. I am deliberately being a bit vague as if you don't know how to do this based on the minimal information, you shouldn't be messing with the database 😛
Next, make a copy of /wp-content/plugins/speakout/includes/addnew.view.php
However note that this is liable to be over-written whenever an update has changes to this file...which is often.
Can I display the petition as a widget?
Yes. Once you've created a petition, go to the Widgets screen and drag the "SpeakOut! Email Petitions" widget into a sidebar. In the widget's options, enter a Title and a Call to Action and then select the petition you wish to display.
Why is my page showing the shortcode instead of the petition?
Find the shortcode on the page e.g. [emailpetition id="3"], delete the space and type it again. The original code included a non-breaking space which caused a problem with Wordpress. It might have been a WordPress update that caused it to stop working.
How do I create a new petition?
Select "Add New" from the "SpeakOut!" menu in the dashboard.
Complete the "Add New Email Petition" form with the options you desire and save your petition by clicking the "Create Petition" button.
Enter the petition's shortcode into any page or post where you want the petition form to appear.